
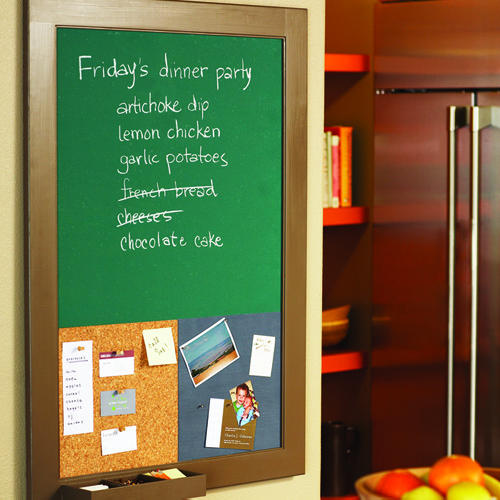
FurnishYourself.com: A message board is a fun thing to have in every house! With different uses, it can be a play board for the kids or used as a family planner in a busy household. Learn to make your very own customized message board in 4 quick DIY steps.
Supplies:
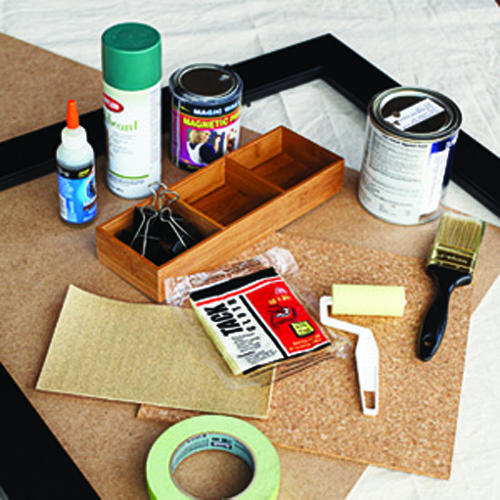
- Wooden picture frame- 24 X 36″
- Fibreboard/Hardboard- 24 X 36″ ( This size can be customized depending on the space available)
- Chalkboard spray paint- 1 can
- Magnetic paint-1 can
- Small paint roller
- Sand paper
- Drop cloth
- Wood glue
- Divided drawer organizer tray
- Clamps/Large binder clips
- 12 X 12″ Cork tiles
- Stain/ Paint for the frame
- Paintbrush
- Painters tape
Step 1: Dismantle the frame
Assuming the picture frame came with its own hardboard and glass, dismantle each component and keep aside.
Step 2: Prepare the hardboard
Take the hardboard and partition into equal halves by width using painters tape. Place the hardboard on a drop cloth and spray 3 coats of chalkboard paint on it, allowing enough time to dry between each spray coat
In the other half of the hardboard, make another section using painters tape along the height. Use one of the sections to apply 3 coats of magnetic paint with the paint roller. Ensure the paint is dry before the next coat is applied.
Step 3: Attach the drawer to the frame
Take the drawer organizer tray and attach it to the frame using wood glue. Secure the tray in place using clamps. This tray can be used to hold post-its, Pin heads, chalk sticks and buttons for use on the message board.
Step 4: Put together the frame
Now insert the hardboard into the frame and affix on the wall using the hooks/hardware that came along with the frame.
Thats it! Your message board is ready to use. Customize its size depending on the space available and make your house a fun place to live in!
Credits: Sunset


